
PyGTK CD Ripper Tutorial - Part 4
Part 1 of this pygtk tutorial stopped with a working toolbar and two place
holders. Part 2 of this tutorial extended this minimal UI with a list of
songs which was created using GTK ListView. Part 3 showed how to gain better control
on ListView.
If you tried running the complete product of Part 3 of the tutorial, you got the following UI:
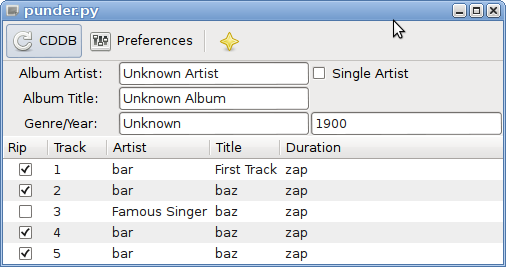
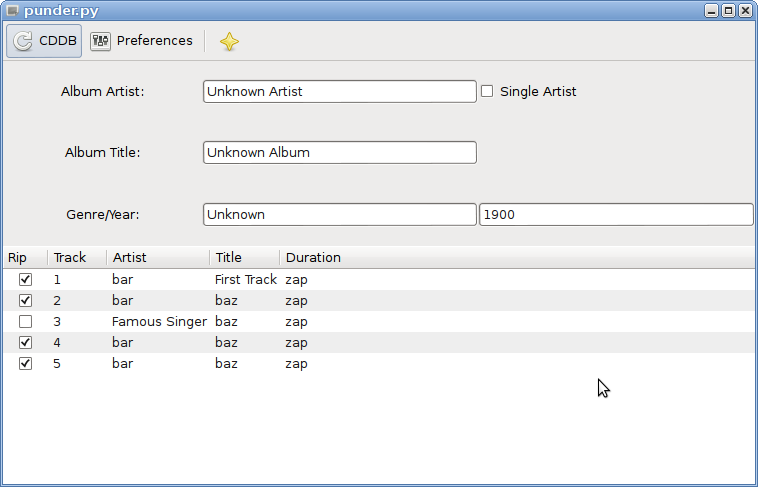
This GUI looks quite OK, but it has some quirks which make it look a bit odd, for example, if you resize the default window, you will notice how un-proportional it suddenly looks:
Earlier, when the basic UI was created, the vbox widget was created without too much explanation
with the method:
vbox = gtk.VBox(False)
Which meant the vbox widget is not homogeneous. If set to True, all the widgets in the box
will be the same size, of which the size is determined by the largest child widget. Here is how the
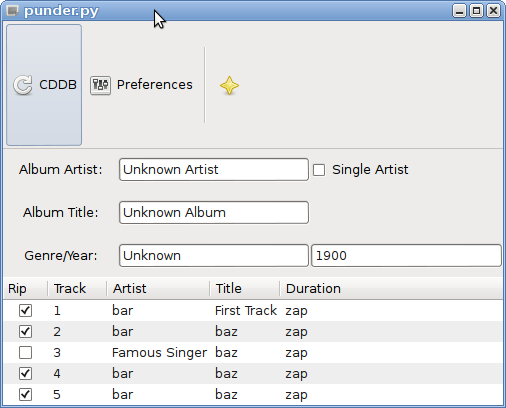
UI will look like when constructing homogeneous VBOX:
Next the table added is created with the option expand set to false, there for, when resizing the window, the height of the table does not chage.
vbox.pack_start(album_table, False)
However,now the size of the table elements does change. More specifically,
the elements stretch. Fixing this requires some more changes. The table looks
really odd when resizing it. By default, the child widget will do nothing
when the container cell expand. This is controlled by the xoptions and yoptions
variables than can be given when attaching a child widget to the table.
For example, telling all the widgets in the left most column to expand
when expanding the table is done with:
album_table.attach(artist_label, 0, 1, 0, 1,  gtk.FILL)
album_table.attach(album_genyear, 0, 1, 2, 3, gtk.FILL)
album_table.attach(album_label, 0, 1, 1, 2, gtk.FILL)
It also makes sense to make sense to fix the size of the most right column, since it is not really expected to a have a number larger then 4 digits in the "Album Year" field:
 album_table.attach(album_year, 2, 3, 2, 3, gtk.FILL)
 album_table.attach(single_artist, 2, 3, 0, 1, gtk.FILL)
This will cause the UI already to comply much more with what we expect it,
when expanding the window. More then one xoption or yoption can be
specifying with the pipe sign. This is done in the middle column of the
table. It is enough just to tell the smallest expected widget it must
expand and fill the space, to fit with the other widgets' size:
album_table.attach(album_genre, 1, 2, 2, 3, gtk.EXPAND | gtk.FILL)
Just for the consistency, these options can be given also when attaching the other widgets in the middle column:
 album_table.attach(artist_name, 1, 2, 0, 1, gtk.EXPAND | gtk.FILL)
 album_table.attach(album_name, 1, 2, 1, 2, gtk.EXPAND | gtk.FILL)
And the UI now behaves as expected.
As a reader with fine eye you will notice that the text labels in Asunder are
aligned to the left, compared to the labels in this UI which are centered.
Not a big deal for the look and fill, but never the less an opportunity to
introduce another method that many GTK widgets posses, alignment.
GTL.Label widgets have a method which allows one to control where the text will
be located inside the widget. This method accepts the following arguments:
xalign and yalign both set the fraction (0.0-1.0) of free space (horizontal and vertical
allocation minus widget width and height respectively) to place to the left of the widget or
above it. Therefore, calling the Genere label's set_alignment with the following argument
will flush it to the left:
album_genyear.set_alignment(0,0.5)
For consistency, the same method and arguments are used for the other labels:
album_label.set_alignment(0, 0.5)
artist_label.set_alignment(0, 0.5)
The UI now behaves completely as the UI of Asunder. It just does nothing mostly.
That is because most of it's buttons are not connected to anything. Hence, pressing
on them, triggers no action. However, before adding more functionality to the UI
class, it is time to take a look and see if some simplification can be done to
make the code shorter, readable and more maintainable.
One place where there is a lot of code repeated is the method create_columns.
Almost every time that a column with is created and attached to treeView the same methods
are called, e.g.:
 rendererText = gtk.CellRendererText()
 column = gtk.TreeViewColumn("Track", rendererText, text=1)
 column.set_sort_column_id(1)
 treeView.append_column(column)
It makes sense to rewrite the method using a short for loop:
 def create_columns(self, treeView):
    """
    create columns for treeview of track list
    """
    cell = gtk.CellRendererToggle()
    cell.connect("toggled", self.on_toggle, self.liststore)
    column = gtk.TreeViewColumn("Rip",cell,active=0)
    column.set_sort_column_id(0)
    treeView.append_column(column)

    column_titles = ["Track", "Artist", "Title", "Duration"]
    for idx, title in enumerate(column_titles):
        rendererText = gtk.CellRendererText()
        column = gtk.TreeViewColumn(title, rendererText, text=idx)
        column.set_sort_column_id(idx)
        treeView.append_column(column)
That is it, the code for the UI is now pretty much documented and looks like Asunder. So it is time to start connecting all the buttons to actual actions.
Making buttons do stuff.
Earlier in this tutorial, the About button was connected to a "stock"
help dialog. The "stock" means it is a generic GTK object, with specific bounded
methods. Later, these methods will be used to create a full blown help dialog.
But first, the preferences dialog will be created and populated.
The PunderUI is quite long already, and it will become quite complex if more code will be added to it. Hence, the Preference dialog will be created in a separate class, and a method inside PunderUI will create the Dialog instance. This is done in the following lines:
    # Add preferences button
    pref_button = gtk.ToolButton(gtk.STOCK_PREFERENCES)
    # Setting the button to important, shows its label
    pref_button.set_is_important(True)
    # connect the button the pref_dialog method
    pref_button.connect("clicked", self.pref_dialog)
When pref_button detects a click it calles the method pref_dialog:
def pref_dialog(self, widget):
    """
    A simple method to initiate a PrefDialog instance.
    """
    PrefDialog()
This method has only a call to create the preferences dialog which is defined
in the class PrefDialog:
class PrefDialog():
    """
    create a very basic preferences dialog.
    """
    def __init__(self, window):
        """
        initialize the preferences dialog, two buttons
        that do nothing when pressed.
        """
        # title, parent window, flags (0, for defaults), no buttons
        dialog = gtk.Dialog("Preferences", window, 0,
        (gtk.STOCK_CANCEL, gtk.RESPONSE_CANCEL, gtk.STOCK_OK, gtk.RESPONSE_OK))
        dialog.set_default_size(250, 300)

        response = dialog.run()
        dialog.destroy()
Running the code of a simple preferences dialog will produce the following UI main windows a simple preference dialog containing "Cancel" and "OK" buttons:

The next part of this tutorial will continue by expanding the preferences dialog with a GTK.Notebook, demonstrating again packing of multiple widgets. It will also show how to use the button to trigger other actions. So, stay tuned for the next part!
Share this post: